
Report Settings and Word Templates
Use System → Report to choose a default layout, manage Word templates, configure images and export options, and customize report titles by standard and plan type. Click Save settings after changing the default template, options or titles. The next time you open the export dialog, it reads the latest saved defaults.
Quick start
- Open System → Report, click Download sample template, and edit the cover, project information, headers, footers and logo in Word.
- Keep
{{report.body}}alone in a paragraph in the document body. Generated result tables and images are inserted here. Add a summary or table of contents using the instructions below if needed. - Enter a recognizable New template name, then click Upload DOCX on the same row to upload your file.
- The new template is selected after upload. Set the image rows and columns under Common options → Image layout per page (for example, 3 × 2), adjust the other common options and Report titles, then click Save settings.
- Return to the plan's Task or Report page and click Report to export. Check that Word Template contains your saved selection, choose the export scope, and submit.
- In Report Center, wait for Status = Finished and Progress = 100%, then download the report. If it has a table of contents, open the generated DOCX in Word, update the table and check the page numbers.
To use the built-in layout, choose System layout under Default template, configure the system layout options below, and save.
Select, upload and delete templates
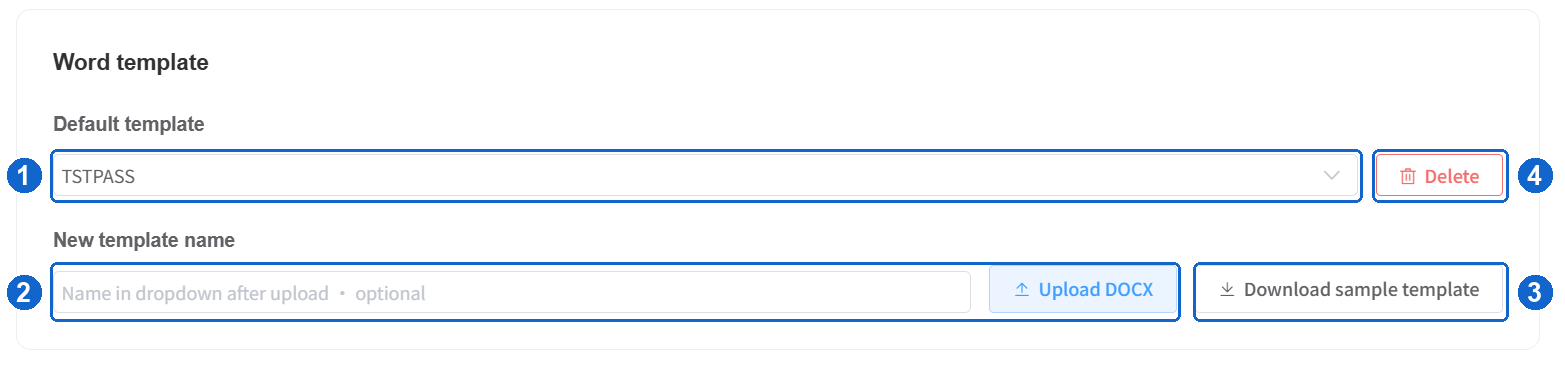
Figure 1: Template controls. Blue numbers match the table below. Click the image to enlarge it.
| Marker | Control | Use |
|---|---|---|
| 1 | Default template | Select System layout or an uploaded Word template. Save settings to use it by default for new exports. |
| 2 | New template name | Name the next upload, up to 120 characters. Leave blank to use the file name. This name appears in the dropdown; it does not rename the selected template. |
| 2 | Upload DOCX | Upload your edited .docx. A successful upload saves the file immediately; making it the default requires Save settings. |
| 3 | Download sample template | Download a sample with a cover, project information page and body marker. Add the optional summary marker yourself if needed. |
| 4 | Delete | Remove the currently selected template after confirming the dialog. System layout cannot be deleted. |
Each upload creates a separate version, even if its name matches an existing template. Duplicate names show a short version ID to distinguish them. To revise a template, edit your source DOCX, upload it again, and save the new default selection.
Deletion takes effect immediately after confirmation, without Save settings. If the deleted template was the saved default, future exports default to System layout. Queued and historical reports retain their original template reference; deleting a template does not delete those reports.
Keep the source template
Save a separate source DOCX for future uploads. A generated report has already replaced the body marker and may contain generated styles and cached directory fields, so it cannot be uploaded directly as a reusable template.
Common options
These options apply to both System layout and Word templates. Click Save settings after making changes.
| Option | Effect |
|---|---|
| Hide note | Omits notes attached to generated result tables. Static text entered in the template remains. |
| Export PDF | Exports PDF alongside Word by default. You can override this for an individual export. |
| Hide chapter number | Removes generated chapter numbers; headings remain available to the table of contents. |
| Maximum image size (cm) | Sets the maximum width W and height H of generated measurement images in centimeters. Both must be positive. These are size limits; actual images scale proportionally to fit the available page grid. |
| Image layout per page | Sets a grid with Rows (1–5) and Columns (1–3). The maximum images per page is rows × columns, up to 15 images. |
Arrange images in multiple columns
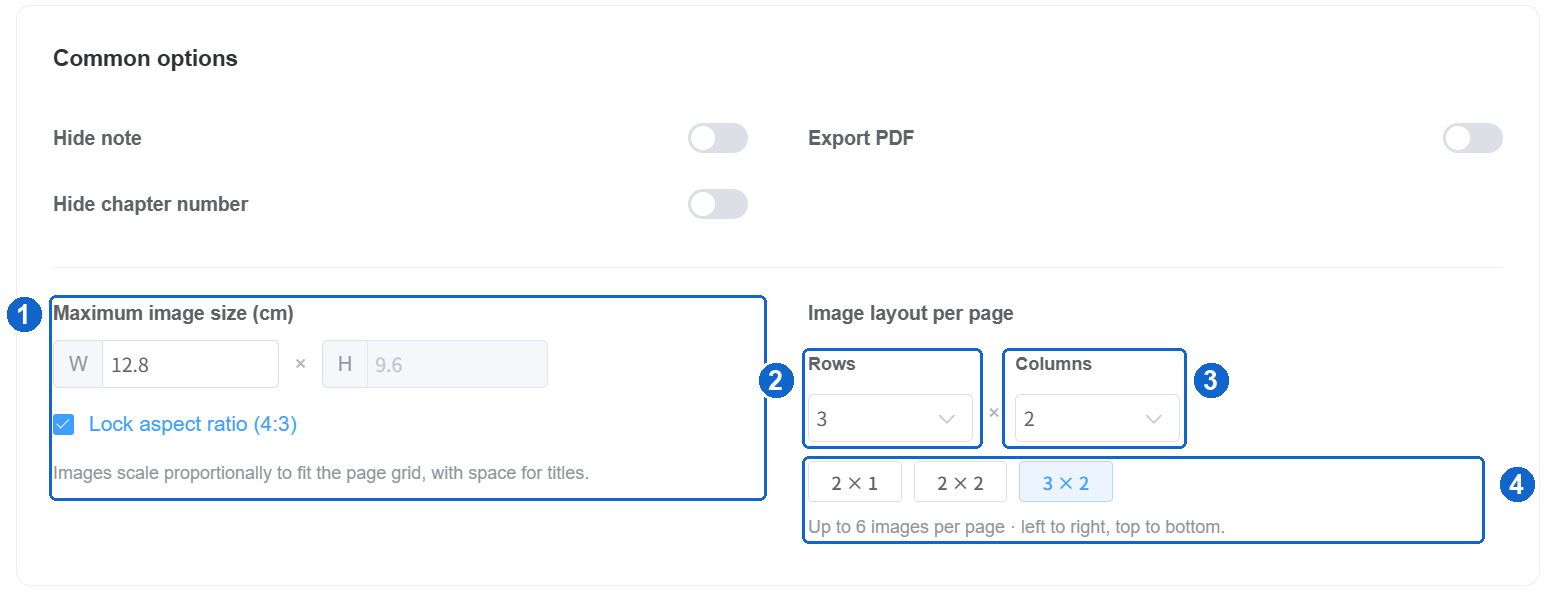
Figure 2: The screenshot selects 3 rows × 2 columns, allowing up to 6 images per page. The blue numbers match the steps below.
- Size limits (marker 1): Enter width and height limits in Maximum image size (cm). Lock aspect ratio (4:3) calculates the height limit from the width; unlock it to set both limits independently. Images always retain their source proportions, regardless of this checkbox, and are not stretched to fill a cell.
- Rows (marker 2): Select the maximum rows per page under Rows, from 1–5.
- Columns (marker 3): Select the maximum images per row under Columns, from 1–3. Rows = 3 and Columns = 2 allows up to 6 images per page.
- Presets (marker 4): Alternatively, click 2 × 1, 2 × 2 or 3 × 2. The Up to … images per page hint below shows the current page capacity.
- Click Save settings at the bottom of the page, then export. Previously downloaded Word / PDF files do not change automatically; regenerate existing reports in Report Center and download the new files.
| Preset (rows × columns) | Maximum images per page | When to use it |
|---|---|---|
| 2 × 1 | 2 | Larger single-column images for reading axes and measurement parameters. |
| 2 × 2 | 4 | Two columns to balance image size and page count. |
| 3 × 2 | 6 | A compact two-column layout; check that image text remains readable after export. |
Images retain their original report order and fill the grid left to right, then top to bottom. For example, 8 images in one image group using 3 × 2 are arranged as follows:
| Position | Page 1, left | Page 1, right | Page 2, left | Page 2, right |
|---|---|---|---|---|
| Row 1 | Image 1 | Image 2 | Image 7 | Image 8 |
| Row 2 | Image 3 | Image 4 | — | — |
| Row 3 | Image 5 | Image 6 | — | — |
The dashes only indicate that no images remain; the report does not duplicate images to fill the grid. The last page contains only the remaining images. A test item or image group may have fewer than a full page, so “up to 6 images per page” does not mean every page must contain 6 images.
The system allocates space from the paper size, margins, rows and columns, with room reserved for captions and spacing. Each caption stays on the same page as its image; if there is insufficient space, they move to the next page together. Actual images may be smaller than the configured maximum dimensions. More rows or columns produce smaller images. Reduce the rows or columns for long captions or limited template space, and check the final Word / PDF pagination and legibility.
Existing single-column settings and Word templates
The previous “N images per page” setting is read as N rows × 1 column. Confirm the rows and columns and click Save settings to apply the new layout.
The image grid works with both System layout and Word templates. Keep one {{report.body}} in the template; no additional body markers are needed. Do not enable Word's page columns under Layout → Columns.
System layout options
The following settings appear only when Default template = System layout. Their saved values are retained when you switch to a Word template.
| Option | Effect |
|---|---|
| Company title / Company logo | Sets the company name and logo used by the built-in layout. |
| Export project info | Adds system-generated project information and, for a combined report, a test summary. This option also appears in the export dialog only for System layout. |
| Page header / Page number | Controls headers and page numbers in the built-in layout. |
| Document index | Adds a table of contents independently of Export project info. Each file gets its own directory when exports are split by Item or Band. |
A Word template controls its own paper size, margins, cover, headers, footers, logos, page numbers and table of contents. Template exports do not add a system project information page. The sample already includes a cover and project information page; use the fields listed below for automatic values and edit blank cells manually.
Customize titles by standard and Type
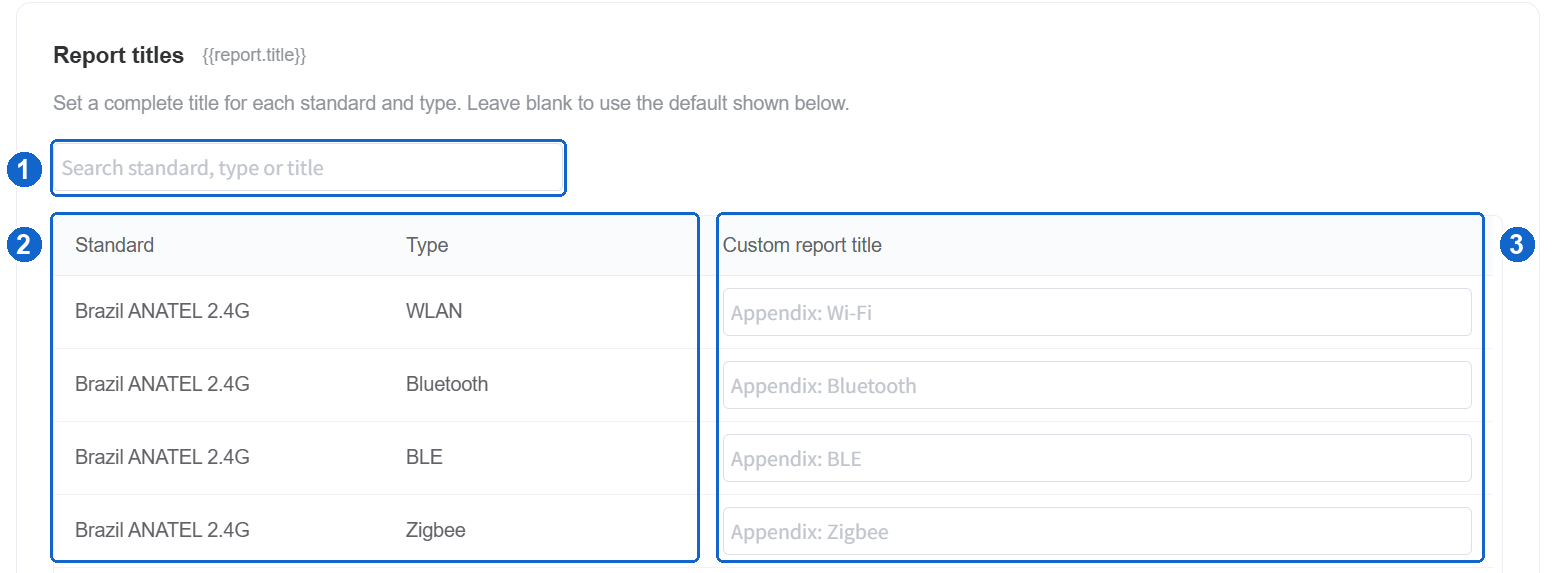
Figure 3: Search at marker 1, check the standard and Type at marker 2, then enter a complete title at marker 3. Grey text shows the default used when the input is empty.
Each row in Report titles identifies a Standard + Type combination. For example, CE 2.4G / WLAN, CE 2.4G / Bluetooth and CE 2.4G / BLE can have separate titles. Use Search standard, type or title to find a standard, type or existing custom name.
Enter the complete text you want {{report.title}} to display in Custom report title, then click Save settings. Titles are single-line plain text, up to 200 characters. Leading and trailing whitespace is removed when saved.
| Setting | Displayed in the template |
|---|---|
| Leave blank | Uses the row's grey default, such as Appendix: Wi-Fi or Appendix: BLE. |
| Enter Bluetooth Test Report | Displays exactly Bluetooth Test Report, without an automatic Appendix: prefix or any other additions. |
| Clear a custom title and save | Restores the default for that standard and type. |
The priority is Report Title entered for this export → saved title for the matching standard and Type → system default. The grey hint in the export dialog does not need to be typed; leave the input empty to use the configured title. Each opening clears the previous export's temporary override.
Custom names apply to {{report.title}} across Word templates. They are separate from the output file name and System layout's Company title, and do not change the built-in cover. Queued and historical reports retain their saved title; create a new export task to use a new title.
The table lists implemented standards and plan types available under the current license. Saved names for standards temporarily hidden by a license change are retained and become available again when those standards are enabled.
Edit a Word template
Body marker and automatic fields
Keep exactly one {{report.body}} in the main document body, alone in a paragraph and outside tables. Generated result tables and images are inserted here; static content before and after the marker remains. Do not put it in a header, footer, text box or table-of-contents field.
The following regular fields can be placed in ordinary paragraphs or table cells in the body, header or footer. Keep each field within one paragraph and use the exact spelling, case and double braces shown below. Values are inserted as plain text.
| Field | Information |
|---|---|
{{project.report_no}} | Project report number |
{{project.title}} | Project title |
{{project.client}} | Client |
{{project.manufacturer}} | Manufacturer |
{{project.tester}} | Test engineer |
{{plan.title}} | Plan title |
{{report.standard}} | The plan's standard |
{{report.title}} | Uses the export override, then the saved standard/Type title, then the default |
{{report.export_date}} | Export task creation date |
Use Word's native PAGE, NUMPAGES and SECTIONPAGES fields for page numbers and counts. Blank spaces without fields in the information table are not filled automatically; edit them in the source template or generated report.
Add a test summary
Type a heading such as Test Summary where you want the summary, then put {{report.summary}} alone in the next paragraph. For example, place this after the cover and project information:
Test Summary
{{report.summary}}

{{report.body}}
{{report.summary}} is optional and may appear at most once. Keep it alone in a paragraph in the main body, outside tables, headers and footers, and separate from its heading. To start results on a new page, use Ctrl+Enter in a separate paragraph after the summary marker, then keep the body marker. Save and upload the edited template.
The marker becomes a Test Item / Result table using the test data selected for this export:
| Export mode | Summary in each file |
|---|---|
| Combined report | Included test items |
| Split by Item | That item's bands |
| Split by Band | That band's test items |
Non-Pass results are highlighted. Empty results without tables or images are omitted. If the entire file has no results, the summary says No test results / No data, never Pass.
The summary works independently of Export project info. Omit the summary marker if no summary is wanted, but always keep {{report.body}}. The template controls the summary heading and page breaks.
Add a table of contents
Choose a position after the cover and project information, before
{{report.body}}. Use Ctrl+Enter for page breaks if needed; do not insert section breaks.Type Contents using an ordinary paragraph style so it does not include itself in the directory.
In a new paragraph, press Ctrl+F9 to create a Word field. Between its braces, enter the code below. The braces must be created by Word, not typed manually.
textTOC \o "1-3" \h \z \uSave and upload the source template without updating the empty directory. Keep the body marker outside the directory field.
Open the generated DOCX in Word, right-click the directory and select Update Field → Update entire table. Check headings and page numbers, then save. If field codes are visible, use Alt+F9 to switch back to results. Ctrl+A → F9 also updates document fields.
The \u switch includes the outline levels of generated report headings. Headings remain available to the directory when chapter numbers or system project information are hidden. The system preserves the template's directory and does not add a second system directory.
Table of contents and PDF
Avoid Word's Automatic Table gallery entries that wrap the directory in a content control. Template validation does not support content controls; use the direct field method above.
The report server's PDF converter may refresh the directory and paginate differently from Word on your computer. If the exported PDF has an empty directory or stale page numbers, update the generated DOCX in Word, export the final PDF from Word, and check its page numbers.
File and layout requirements
- Upload a non-empty
.docxup to 10 MiB, with a total uncompressed size no greater than 50 MiB. - Use one section, with explicit paper size and margins. The usable body area must be at least 12.7 cm wide and 5.08 cm high. Use page breaks to start new pages. Word body columns are not supported; arrange measurement images in multiple columns using Image layout per page in the system.
- Headers and footers support ordinary paragraphs, tables and embedded logos, including different first-page and odd/even versions. Embed images instead of linking to external images.
- Text boxes, content controls, tracked changes, macros, embedded objects and external links are not supported. Dynamic fields and expressions other than the listed placeholders and native PAGE / NUMPAGES / SECTIONPAGES / TOC fields are not supported.
Individual exports and historical reports
When you open the report export dialog from a plan, it loads the latest saved default template, PDF and project information options. You can change Word Template to another template or System layout for this export. With a Word template selected, enter a complete Report Title if you want an override for this export only.
Check the available Item, Band, result filters and split options for the current standard, then submit. The export dialog selects the current export's settings; template uploads, sample downloads and deletion are managed in System → Report.
Existing tasks retain the template version and template field values selected when they were created. Changing the default template or title settings does not replace historical tasks' templates or titles; create a new export to use the new configuration. Regenerating a historical report may still read updated measurement results and some report settings, so it does not restore a complete snapshot of historical data.
Troubleshooting
| Symptom | What to do |
|---|---|
| The next export still uses the old template after upload | Select the new template, click Save settings, then reopen the export dialog. |
| Editing New template name does not rename the old template | This input names the next upload. Edit your source file and upload it again. |
| Template validation fails | Check file size, the single-section layout, the required body marker and unsupported content listed above. If used, the summary marker must also be alone in a body paragraph. |
| Templates or default settings fail to load | Click Retry. Wait for defaults to load before submitting the export. |
| Template export service is offline | Ask the administrator to check the report generation service. Uploads and sample downloads remain available, but template report generation requires the service to be online. |
| A saved template is unavailable | Select an available template or System layout under Default template and save again. |
| Images are smaller than the entered dimensions after enabling multiple columns | Maximum image size sets upper limits. Images scale to allow for the grid, captions and margins; reduce rows or columns for larger images. |
| A page has fewer images than the configured count | Rows × columns is a capacity limit. The last page of an image group may not be full; long captions and available page space can also affect pagination. |
| An error says image titles do not fit the grid | Reduce Rows or Columns, save, and export again. Check the template's usable page area if necessary. |
| An old report still separates captions from images | Save the layout, regenerate the report and download the new file. If the issue persists, ask the administrator to confirm that the report service is updated. |
| The directory is empty or page numbers are incorrect | Update the entire table of contents in the generated DOCX and check the final PDF; see “Add a table of contents.” |
Related pages: System Settings · Report Preview · Report Center